Import/Export via Excel
When it comes to working large sets of data, almost nothing can beat Excel. In the beer industry, it practically keeps the lights on.
Wouldn't it be great to use the power of Excel with the power of Tagify?
Let's do it.
Quick Start
When it comes to tags, you can import (uploading a spreadsheet) and export (downloading the project as an XLSX).
While editing a tag project on the web:
- Click the Tools button up top.
- Click Export to Excel or Import from Excel.
Exporting
When exporting a project, Tagify will create an Excel file based on your tags. This is a great way to get an idea of what Tagify is looking for when importing a project later on.
Importing
For Tagify to use your spreadsheets it might require a bit of prep. The bare minimum setup is a header row with:
- Brand
- Package
- Price
Alternatively, Tagify can use also use your brand data in place of the normal Brand and Package columns. More details on that below. But let's keep things simple and just focus on our Brand and Package columns for now.
Now, the data itself has to be at least a close match to what you've got in Tagify. Let's use this as an example:
| Brand | Package | Price |
|---|---|---|
| Bud Light | 12pk Cans | $9.99 |
| Budw | 12pk Can | 9.99 |
| Lite | 16oz Can | 2/$5 |
Tagify will find your header row and begin looking at your data directly beneath it. In the above case, the first row it looks at is the Bud Light row. It will take that brand name and try to find the closest match in your brand list and use it.
Looking at the brand "Budw" Tagify will probably match it to Budweiser (assuming you've got something like that in your brand list). Lite would probably match to Miller Lite and so on.
Packages are treated the same way, the closest match wins. The Price column looks for a price point (more info below).
That's the absolute minimum Tagify needs to get started. You can probably slightly modify an existing sheet you've been using and drop it right in. So long as you have something like the above.
After your upload
Assuming your sheet looks good, you'll be presented with a break down of what Tagify sees. For example:
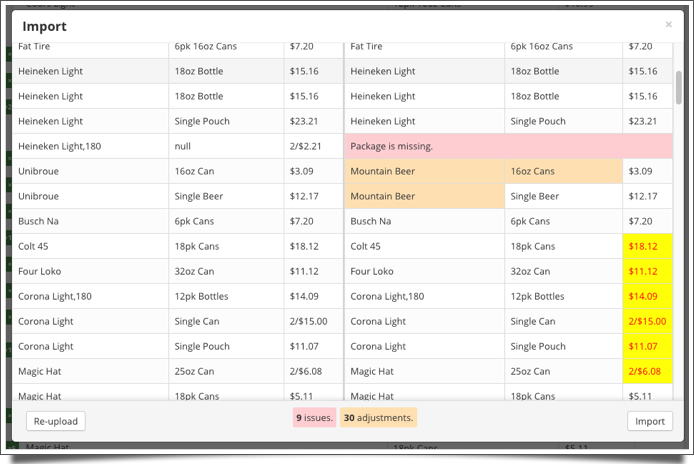
From here, you see exactly how Tagify has interpreted your sheet. Errors are tags that are skipped, while Adjustments are changes that were made that differ from your input.
Supported columns
- UPC
- Item key
- Item description
- Brand
- Package
- Price
- Alt text
- Quantity (or #)
- Style
Column Details
Tagify is very aggressive when trying to find something that matches your data. It will probably find something on virtually any data you enter, so beware.
It's recommended to play around with importing to get a feel for what it's looking for.
UPC
If a UPC found, Tagify will use this to find your brand/package. Check out more details on UPCs & brand data for more info.
Item Key
If a item key is found, Tagify will search for it and try to find your brand/package. Check out more details on UPCs & brand data for more info.
Item Description
Tagify can read your item description and use your Brand aliases and Package aliases to figure out the correct brand and package. For example, let's look at this item description:
CLUBTAILS MARGARITA 4/6/12NR
Assuming you've got your Clubtails Margarita brand with an alias of "CLUBTAILS MARGARITA" and your 6pk Bottles package with an alias of "4/6/12NR", Tagify knows exactly what to do.
Brand
This needs to match to something within your brand list. Tagify takes its best guess and you can usually get away with non-exact matches. For example:
| Brand | Package | Price |
|---|---|---|
| Miller Lite | 18oz Bottle | 1.99 |
Here's what it looks for in order:
- Tagify will try to find the exact brand name coming in.
- If it can't, it will then try to find it using your Brand aliases.
- If it can't, it will find a brand name that matches the closest.
Package
Similar to the brand column, Tagify will take its best guess trying to find something similar in your package list. Here's what it looks for in order:
- Tagify will try to find the exact package name coming in.
- If it can't find the above, it will then try to find it in your Package aliases.
- If it can't find the above, then it will find a package name that matches the closest.
Price / Retail
Pricing is really straightforward, give Tagify a retail and you'll be good to go. For example:
- $10.99
- 10.99
- 0.99
- ect.
But what about 2/for's and custom pricing? Again, just tell Tagify what you need:
- 2/$3
- 10 for $10.00
- 3 - 3.33
These are all valid price points and Tagify will automatically convert it. Pretty neat!
Let's take it another step forward:
- 2/$3 or $1.29 each
- 1.99 or single at regular retail
Notice the "or" here. If Tagify sees that in your price, it will split it up and make the first price the actual price of the tag, and the second part the alt text. So using the first example our tag price will be "2/$3" and the alt text will be "or $1.29 each".
Quantity or #
The amount of tags actually printed on this row. If you've got multiple brands per line, the quantity will go with each brand.
Alt Text
This mirrors up with a tag's alt. text option. Any text here will be used and ignored if left blank.
Lines up with the tags print option. Valid options are:
- Yes
- No
An empty cell will default to "yes".
Style
We can also control the style of each individual tag. An empty cell here will use the project's default style.
Settings sheet/tab
When importing, you also have the ability to set project settings from directly within your sheet. Add an additional sheet called "Settings" with headers to set:
- Name
- Customer (can be the customer name or account number)
- Material
- Style
- Gutter (you can use "yes" or "no")
You don't have to use all the headers either. For example, here's what my settings sheet looks like:
| Name | Gutter |
|---|---|
| My Cool New Project | yes |
Email
When you feel comfortable with Tagify using your sheets, you can skip going to the web entirely. Just send your spreadsheets as attachments to: excel@tagify.com
Tagify will take your sheets, convert them into projects and email the final tags back to you. Very similar to making a project via the iOS app.